Android, BtoC, Kotlin, PC, Windows, 紹介
アプリの機能として、配列のデータやリストを一覧として画面に表示させたいということがあると思います。Kotlinでは “ListView” というViewを使うことで、データを一覧で表示することができます。
今回はその表示方法について、解説していきたいと思います。
Adapter
ListViewを使って一覧を表示できると初めに説明しましたが、その際にAdapterというものを使う必要があります。どのAdapterを使うかによって表示できる内容が異なるので、そちらについて簡単に説明します。
ArrayAdapter
まず基本的なものがArrayAdapterを使って表示する方法です。
こちらは文字だけのリストといった、簡単な内容を表示させることができるものになっています。
カスタムAdapter
その他にはAdapterを使いたい形に合わせてカスタムする方法があります。こちらはArrayAdapterと違い、複数のテキストや画像をまとめて表示するということが可能です。
実装方法の解説
サンプル紹介
では、実際にリストを表示する方法について解説していこうと思います。今回はより実践で使える内容をお伝えしたいと思いますので、カスタムAdapterを使ったリストを作成します。
作成する内容は下記に示しているような、所属している社員の「アイコン」「名前」「年齢」を表示するリストになります。
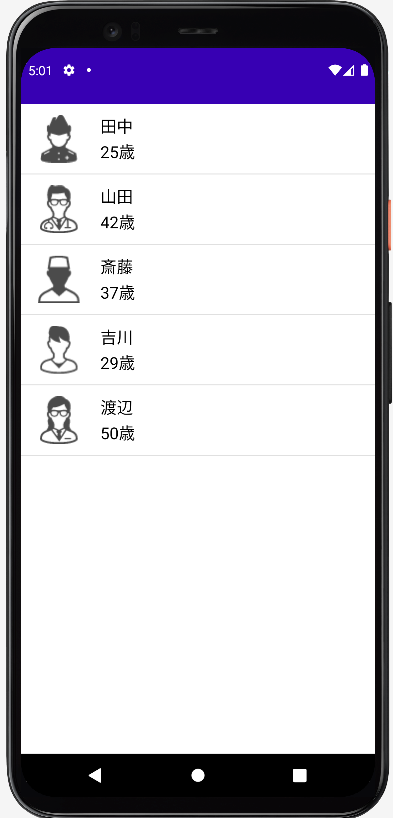
リストを使ってデータを一覧で表示
実装方法の解説
では早速実装方法について解説していきます。
今回はlist-trainingという名前でプロジェクトを作成し、その中に記述しています。
ListViewの実装
まずはリストを表示するために不可欠なListViewを実装します。
今回は activity_main.xml の中に<ListView/>タグを使用して実装します。
<?xml version="1.0" encoding="utf-8"?>
xmlns:android="http://schemas.android.com/apk/res/android"
android:id="@+id/container"
android:layout_width="match_parent"
android:layout_height="match_parent">
android:id="@+id/list_view"
android:layout_width="match_parent"
android:layout_height="match_parent" />
<?xml version="1.0" encoding="utf-8"?>
<LinearLayout
xmlns:android="http://schemas.android.com/apk/res/android"
android:id="@+id/container"
android:layout_width="match_parent"
android:layout_height="match_parent">
<!--ListViewの実装-->
<ListView
android:id="@+id/list_view"
android:layout_width="match_parent"
android:layout_height="match_parent" />
</LinearLayout>
これでListViewの準備は完了です。この後、表示する内容をAdapterを使って設定していきます。
dataクラスの用意
続いて、表示するdataのクラスを用意します。最初に説明したように社員の「名前」「年齢」「アイコン」を表示させたいので、それぞれのパラメータを持つEmployeeクラスを作成します。
package jp.co.chrono.list_training
data class Employee(
val name: String,
val age: String,
val imageId: Int
)
package jp.co.chrono.list_training
data class Employee(
val name: String,
val age: String,
val imageId: Int
)
これでリストに表示するデータのクラスも完成です。
カスタムAdapterの作成
続いて、今回使うCustomAdapterの作成をします。
以下のように記述します。
package jp.co.chrono.list_training
import android.content.Context
import android.view.LayoutInflater
import android.view.ViewGroup
import android.widget.ArrayAdapter
import android.widget.ImageView
import android.widget.TextView
import com.example.list_training.R
class CustomAdapter(context: Context, var employeeList: List<Employee>): ArrayAdapter<Employee>(context, 0, employeeList) {
private val layoutInflater = context.getSystemService(Context.LAYOUT_INFLATER_SERVICE) as LayoutInflater
override fun getView(position: Int, convertView: View?, parent: ViewGroup): View {
val employee = employeeList[position]
if (convertView == null) {
view = layoutInflater.inflate(R.layout.list_item, parent, false)
val imageView = view?.findViewById<ImageView>(R.id.image)
imageView?.setImageResource(employee.imageId)
val title = view?.findViewById<TextView>(R.id.name)
title?.text = employee.name
val age = view?.findViewById<TextView>(R.id.age)
package jp.co.chrono.list_training
import android.content.Context
import android.view.LayoutInflater
import android.view.View
import android.view.ViewGroup
import android.widget.ArrayAdapter
import android.widget.ImageView
import android.widget.TextView
import com.example.list_training.R
class CustomAdapter(context: Context, var employeeList: List<Employee>): ArrayAdapter<Employee>(context, 0, employeeList) {
private val layoutInflater = context.getSystemService(Context.LAYOUT_INFLATER_SERVICE) as LayoutInflater
// getViewメソッドでレイアウトを設定
override fun getView(position: Int, convertView: View?, parent: ViewGroup): View {
// Employeeを取得する
val employee = employeeList[position]
// レイアウトの設定
var view = convertView
if (convertView == null) {
view = layoutInflater.inflate(R.layout.list_item, parent, false)
}
// それぞれの項目を表示するviewの設定
val imageView = view?.findViewById<ImageView>(R.id.image)
imageView?.setImageResource(employee.imageId)
val title = view?.findViewById<TextView>(R.id.name)
title?.text = employee.name
val age = view?.findViewById<TextView>(R.id.age)
age?.text = employee.age
return view!!
}
}
CustomAdapterは、ArrayAdapterを継承しています。コンストラクタでContextとListを受け取って、ArrayAdapterのコンストラクタに渡しています。
ArrayAdapterの第二引数のresourceは0を渡しておいて、getViewメソッド内で実装します。
また、CustomAdapterはgetViewメソッドをオーバーライドしており、このgetViewメソッド内でそれぞれのレイアウトを設定しています。
引数として渡ってくるpositionは、項目の位置が格納されているので、これを使って対象のデータを取得します。
初回の画面表示では convertView が null で渡ってくるので、新たにレイアウトを設定するようになっていますが、再描画する場合は、最初に設定したレイアウトを再利用するという形になっています。
その後、以下の list_item.xml に実装した各Viewの設定をしています。
<?xml version="1.0" encoding="utf-8"?>
xmlns:android="http://schemas.android.com/apk/res/android"
android:layout_width="match_parent"
android:layout_height="match_parent"
android:layout_width="60dp"
android:layout_height="match_parent" />
android:layout_width="0dp"
android:layout_height="wrap_content"
android:layout_weight="1"
android:orientation="vertical"
android:layout_marginStart="16dp">
android:textColor="#000000"
android:layout_width="match_parent"
android:layout_height="wrap_content"
android:layout_marginBottom="4dp" />
android:textColor="#000000"
android:layout_width="match_parent"
android:layout_height="wrap_content" />
<?xml version="1.0" encoding="utf-8"?>
<LinearLayout
xmlns:android="http://schemas.android.com/apk/res/android"
android:layout_width="match_parent"
android:layout_height="match_parent"
android:padding="12dp">
<ImageView
android:id="@+id/image"
android:layout_width="60dp"
android:layout_height="match_parent" />
<LinearLayout
android:layout_width="0dp"
android:layout_height="wrap_content"
android:layout_weight="1"
android:orientation="vertical"
android:layout_marginStart="16dp">
<TextView
android:id="@+id/name"
android:textColor="#000000"
android:textSize="18sp"
android:layout_width="match_parent"
android:layout_height="wrap_content"
android:layout_marginBottom="4dp" />
<TextView
android:id="@+id/age"
android:textColor="#000000"
android:textSize="18sp"
android:layout_width="match_parent"
android:layout_height="wrap_content" />
</LinearLayout>
</LinearLayout>
ここで、それぞれの項目のレイアウトを変えることができます。表示されているコードはあくまでも例としての内容になりますので、テキストの色や大きさなど、自分の好みに合わせて編集してみてください。
ListViewにCustomAdapterを設定
最後に MainActivity.kt で CustomAdapter を生成し、ListViewのAdapterとして設定します。
今回は、リストとして表示するデータもここで設定します。ただし、その場合アイコンに使う画像はあらかじめインポートしておく必要がありますので、注意してください。
package jp.co.chrono.list_training
import androidx.appcompat.app.AppCompatActivity
import android.widget.ListView
import com.example.list_training.R
class MainActivity : AppCompatActivity() {
lateinit var customAdapter: CustomAdapter
lateinit var employeeList: ArrayList<Employee>
override fun onCreate(savedInstanceState: Bundle?) {
super.onCreate(savedInstanceState)
setContentView(R.layout.activity_main)
val employee1 = Employee("田中", "25歳", R.drawable.icon_107620_48)
val employee2 = Employee("山田", "42歳", R.drawable.icon_113120_48)
val employee3 = Employee("斎藤", "37歳", R.drawable.icon_113200_48)
val employee4 = Employee("吉川", "29歳", R.drawable.icon_160440_48)
val employee5 = Employee("渡辺", "50歳", R.drawable.icon_113150_48)
val employee6 = Employee("立花", "46歳", R.drawable.icon_107970_48)
employeeList = arrayListOf(employee1, employee2, employee3, employee4, employee5, employee6)
val listView = findViewById<ListView>(R.id.list_view)
customAdapter = CustomAdapter(this, employeeList)
listView.adapter = customAdapter
package jp.co.chrono.list_training
import android.os.Bundle
import androidx.appcompat.app.AppCompatActivity
import android.widget.ListView
import com.example.list_training.R
class MainActivity : AppCompatActivity() {
lateinit var customAdapter: CustomAdapter
lateinit var employeeList: ArrayList<Employee>
override fun onCreate(savedInstanceState: Bundle?) {
super.onCreate(savedInstanceState)
setContentView(R.layout.activity_main)
val employee1 = Employee("田中", "25歳", R.drawable.icon_107620_48)
val employee2 = Employee("山田", "42歳", R.drawable.icon_113120_48)
val employee3 = Employee("斎藤", "37歳", R.drawable.icon_113200_48)
val employee4 = Employee("吉川", "29歳", R.drawable.icon_160440_48)
val employee5 = Employee("渡辺", "50歳", R.drawable.icon_113150_48)
val employee6 = Employee("立花", "46歳", R.drawable.icon_107970_48)
employeeList = arrayListOf(employee1, employee2, employee3, employee4, employee5, employee6)
val listView = findViewById<ListView>(R.id.list_view)
customAdapter = CustomAdapter(this, employeeList)
listView.adapter = customAdapter
}
}
CustomAdapter の第一引数には MainActivity にあたる this を指定し、第二引数でリストの情報を渡しています。
これで実装は完了です。
プログラムの実行
記述したプログラムを実行すると、初めに例として挙げた完成予想図と同じものが表示されます。
設定したレイアウトに合わせて表示
まとめ
いかがでしたでしょうか。今回のようにデータを一覧で表示したいという機会は多いと思いますので、その時々に合わせたリストをぜひ作成してみてください。
また、解説だけだと分かりにくい部分があると思いますので、解説したサンプルも実際に作って理解を深めていってください。